hmmm, will 2016 be the year my MAME fantasies finally cross over into reality?
Oh yeah there’s tons. Just search. Here’s a nice starting point: http://www.recroommasters.com/Arcade_Cabinet_s/4.htm
The big, full size standalone arcade cabinets tend to run $2k and over though, fair warning.
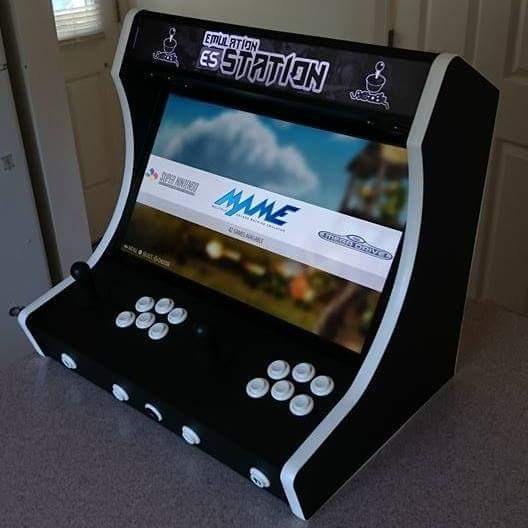
I make and sell kits like these in my spare time, I noticed a picture from one of my kits here too. The controller style arcade is mine, you can get it for 55 dollars or my more popular bartop kit for 100
Look at this on eBay http://www.ebay.com/itm/291826294816
Look at this on eBay http://www.ebay.com/itm/291820465597
1 Like
Has anyone looked into what options we have for games with non-standard controller layout or buttons? If I wanted to play Robotron 2084, I’d need two joysticks one for movements and one for firing. Defender? Tron with a joystick and jogdial. Or Tempest with a jog dial and fire button. Centipede, Millipede, and Crystal Castle I’ve worked out okay with a mouse as a trackball replacement.
The best generic layout is arguably two sticks, 6 buttons each, and a trackball. Then you can play dual stick games as a single player using both sticks, and you’re covered on most mouse-alike games. Takes a fairly wide cabinet though.
Anyone got any tips for a comparable Raspberry Pi 3 kit available in Australia? Everything I’ve found so far is over twice the price and doesn’t include heatsinks.
Hey, I really like your blog and have been reading on and off for quite some time.
Your blog really needs an index at the side. I like to read on my mobile phone, but when I have read the first few articles I spend ages scrolling to find another article I didn’t read. Being able to jump to articles based on the title would be great.
Check out Pico-8 for new “fantasy console” goodness. Works great with Raspberry Pi Zero, 2, 3, etc.
1 Like
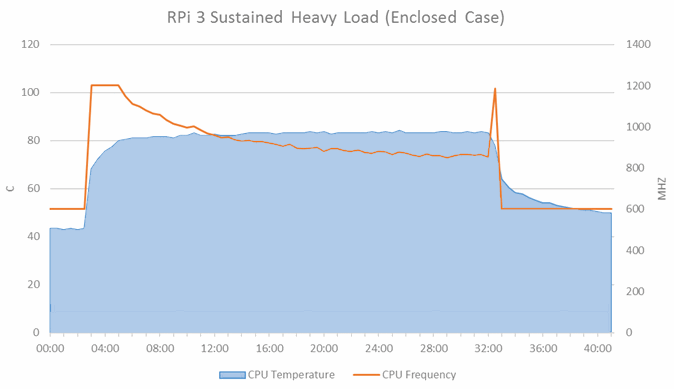
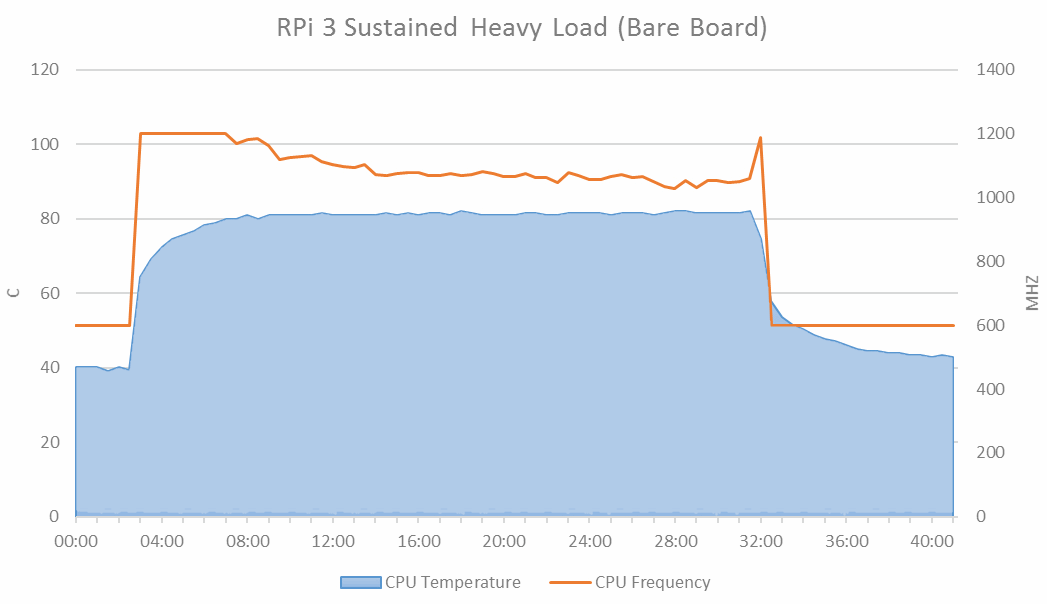
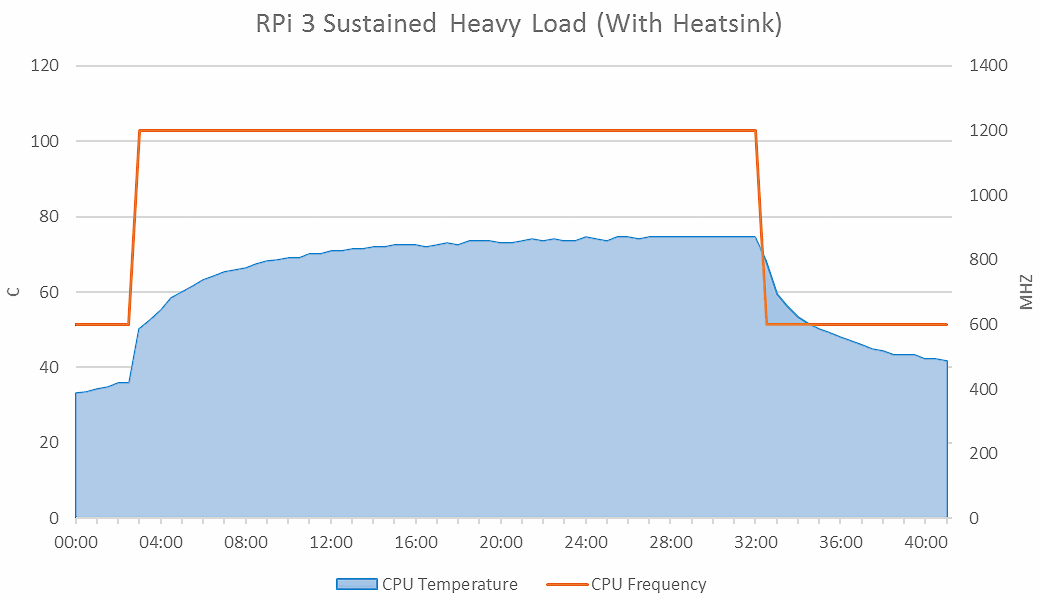
The quick and dirty of safe Pi overclocking:
- Exit to RetroPi console (press menu button on your controller, then select exit) or press f4 any time
sudo -snano /boot/config.txt
the lines you want are:
sdram_freq=500
dtoverlay=sdhost,overclock_50=100
I’ve found the Pi 3 is fast enough that boosting the storage and memory speeds is generally more beneficial to overall performance than CPU power in most cases, and it’s safer.
I no longer blanket advise CPU overclocking due to minor voltage and heat complications I’ve seen. Avoid CPU overclocking unless you are absolutely certain you need the extra CPU power for bleeding edge emulators like Dreamcast.
And before proceeding, make SURE you have:
- a heatsink installed
- a quality power supply designed for large devices (think iPad 3+)
If you are sure you also want to overclock the CPU, add these lines too:
arm_freq=1400
over_voltage=6
You might be able to bump the voltage down if it’s stable in your testing. See RPiconfig docs for details.
Save using ctrl-o, then exit the nano editor with ctrl-x.
reboot and see what happens. Be prepared to re-flash the SD card if it doesn’t work!
To test, I recommend running the included Quake 3 (under Ports) in a few different modes like botmatch, be sure to turn up the graphics in there to max at 1024x768, select Skirmish mode, and add a ton of bots with a fraglimit of 0. Then let it go.
It is a bit weird that the Pi 3 ships without a heatsink. It probably should have one:
If there’s ever a Pi 4 it should absolutely have a heatsink in the default package!
Another site where they build and sell these arcade boxes. They are built around original PCBs:
One thing I hadn’t anticipated; the quality of analog audio out from the Pi is quite .. bad. Lots of interference / noise. Not that it matters a ton for an arcade machine, but it’s still significantly worse than I expected.
I am adding this USB powered, HDMI “audio extractor” box to my build:
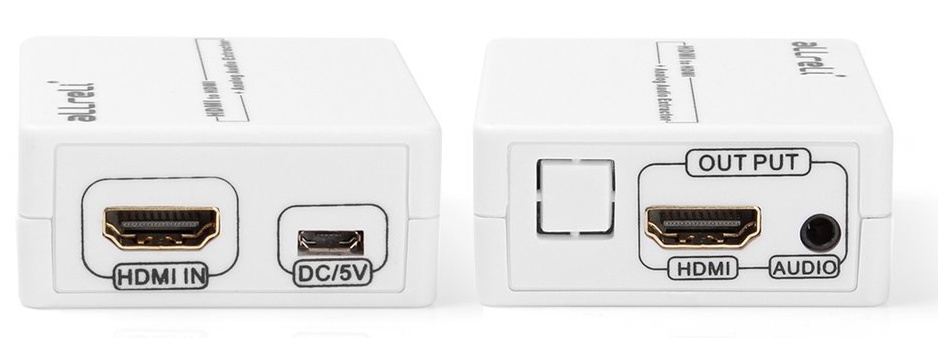
I found one on eBay that looks similar for $17.
I got it, and I can confirm this works grrrrreat! You go from scratchy, fuzzed out analog Pi audio with lots of interference (which you have to crank the volume way up on to hear at all), to pristine digital audio quality. It’s a huge, clearly audible difference – I strongly recommend it!
You will need to force HDMI video with this adapter installed as the Pi has trouble seeing the monitor at boot. But the fix is simple, just reboot with the monitor directly connected, and make sure these options are set in your /boot/config.txt:
hdmi_force_hotplug=1
hdmi_group=1
hdmi_mode=16
Mode 16 is 1080p, 60Hz which is what I expect most will be running but if you need others they are listed here.
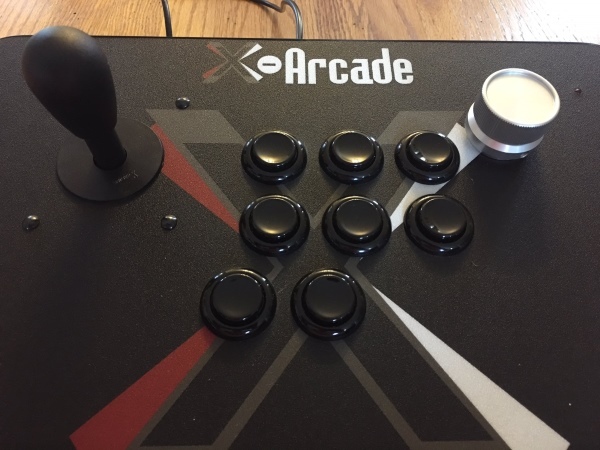
Yo! This is going to be long and probably well beyond the scope of the barcades you’re mostly referencing, but I’m a huge arcade parts enthusiast so this is a really fun topic for me and I’m always happy to share knowledge.
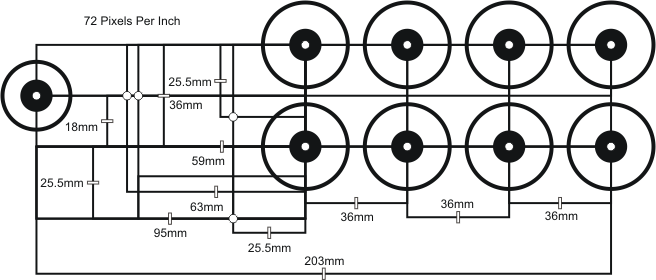
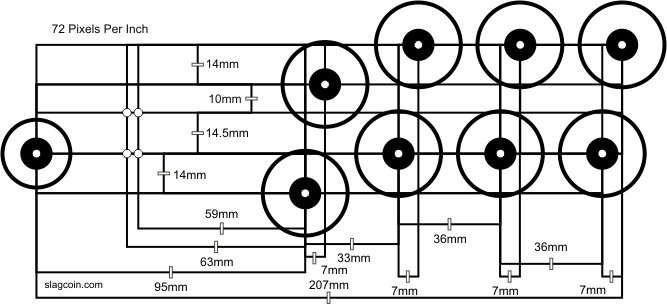
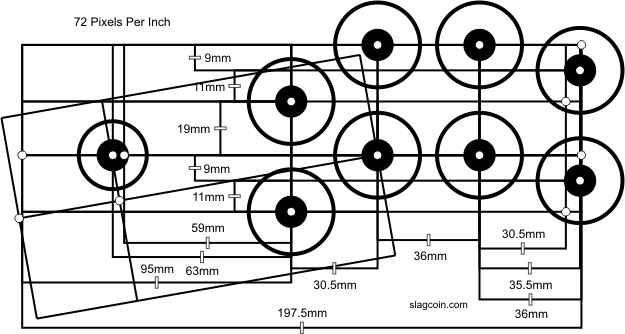
Most of the prefab kits you see are going to have generic parts in them, and as you can see just from the pictures in this thread there are a variety of joysticks, push button types and button layouts. If this kind of thing is fun for you, I highly recommend going to Slagcoin and reading through. They provide the finest baseline on how an arcade joystick interface comes together, including a wide variety of panel layouts that people like myself continue to reference and use on a regular basis today. The most popular setups tend to reflect traditions in various regions, mainly America, Japan and Korea.
Restrictor gates! Know your gates!
For your old school ROM needs, or even current-day arcade experiences, you need to understand gates and how they work with your arcade stick lever. A gate is a clip on the underside that restricts the limits of the joystick’s movement. Modern portable arcade sticks made for competitive fighting games use square gates, allowing you to reach the diagonal corners easily. GameCube players and King of Fighters arcade enthusiasts will recognize octogonal gates, which has visible notches for you to easily tell which direction you’re aiming. Circle gates are typically used for people with a primary need for up/down/left/right cardinals, and very rarely diagonals. These are all “8-way” gates (four cardinals plus four intermediate). Very old arcade machines like your Pac-Man cocktail cabs and such can even have “4-way” gates (restricting to cardinals only) or “2-way” gates for only up/down or left/right. Picking the right gate (or even experimenting with multiple types, they’re dirt cheap!) can go a long way towards having a good experience with your arcade.
American Style
If you’ve ever been to an arcade in the US, you’ll be quite familiar with them. They typically come with large bat tops and spring-loaded concave buttons. These setups are designed for you to slam the hell out of them and keep going. The bat tops use a circular gate with a fairly stiff amount of movement resistance (remember they’re installed in heavy, stand-up arcades that don’t move), and tend to have two rows of buttons in a straight line (sometimes 6 buttons, usually 8). For a long time the parts were distributed by Happ, but following a merger with Suzo in 2005, production was shifted to Suzo’s facilities in China and the quality took a serious downturn. However, you can now buy parts made by Industrias Lorenzo, the company actually manufacturing Happ’s original stuff. If you’re an American-style fan, IL is your jam.
Japanese Style
Popular amongst arcade enthusiasts but not particularly commonplace in western countries, Japan favors a lighter touch. They use shorter-length arcade sticks with lollipop-style ball tops instead of bat tops, and light-to-the-touch convex buttons with plastic microswitches in a Vewlix layout. Because most Japanese arcade machines are sit-down, rather than stand-up, they opt for parts that are quicker and more precise, and require considerably less force than their American counterparts. The ball top format allows for many more (and ergonomically advantageous) hand-holding variations, allowing the legions of Japanese salarymen to hit Taito Station after work for hours on end in comfort. Sanwa is the gold standard manufacturer here – their JLF lever and OBSC buttons are ubiquitous and widely-accepted with many colors and customization options. The JLF has snap-on gates that quickly allow you to switch to circular or octagonal in a matter of seconds, and because the ball tops are removable, people often get customized colors, patterns, swirls, etc. You can even get a bat top that screws into the lever. Other brand makers include Hori (which focuses on high performance fighting game gear) and Seimitsu, which has a slightly heavier feel than Sanwa but also has some really nifty tri-gates that include a little of everything for you to experiment with (that linked example includes 2-way, 4-way and circular 8-way). For those of you considering assembling a countertop barcade, Japanese style parts are probably your best bet to play comfortably without it sliding around.
Korean Style
3D fighting games like Tekken and Virtua Fighter are ridiculously popular in South Korea, so their solutions are based on mostly 4-way inputs (lots of forward-forward-back-back, or down-up movements) with very occasional use of 8-way. To accomplish this, makers Crown and Myoungshin Fanta created a special type of stick with a rubber grommet to restrict movement instead of plastic gates. The nature of the stick gives way easily to cardinal directions, but has heavy resistance towards diagonals… and a very sharp return to neutral (a fellow player who uses a Fanta full time once quipped, “Neutral is a hell of a drug.”). They also prefer Crown’s custom-made push buttons (which have a slightly squishy feedback feel) in Namco’s Noir layout. Crown and Myoungshin gear is a bit difficult to obtain stateside, but there are a few specialty shops that will provide parts or fully-assembled Korean-style arcade sticks for your purposes.
A Modern Aside
In the last couple years, people have begun creating push buttons with Cherry MX microswitches in them, allowing you to drop in your preferred actuation. This was pioneered by GamerFinger a few years ago, but refined gorgeously by Paradise Arcade Shop’s custom-designed OBS-MX line that drops into standard Sanwa rims. Presumably you can customize it with any microswitch type you want, but they offer MX Red, Blue, Brown, Green, Black and Clear to choose from. (I’m assuming MX Clear for our esteemed host.)
Where do I get all this stuff, or at least fulfill my gear lust curiosity?
Paradise Arcade Shop and Arcade Shock come with my highest recommendation, as well as Etokki for exclusively Korean needs. As a general rule for the type of kits you see here, you’ll want to pick the “screw-in” button type (which accommodates thicker installation panels) instead of “snap-in” (used on thin metal panels). If you have issues with the noise made by these, Paradise also offers a large line of silencing pads to mute the button click, and you can also get silent joysticks if the microswitch noises are too loud for your tastes.
Hey, I want a real arcade! Not a little one!
With some sleuthing on your local Craigslist, you can probably find an old arcade that can be refurbished or repurposed to handle your own needs, and there’s also Captain’s Auction Warehouse if you have something specific in mind. Even though these were all wired up for JAMMA style play with actual arcade boards, there’s absolutely nothing stopping you from dropping in your little Raspberry Pi and rewiring the controls directly to it.
This is my baby (alternate view). It’s a Chinese clone of the Taito Vewlix Japanese-style sit down cab, which our community affectionately calls “Chewlix”. Typically they come with only a single player layout, but I was able to get a 2-player arrangement included when I bought it. It’s been great for parties and casual fun, and while I don’t have kids yet, I anticipate leveraging this as a way to introduce them to gaming as a social activity rather than an isolating one (as most iOS and console games typically are). It was originally wired up for Chinese-format JAMMA, but I’ve installed two Brook Universal Fighting Boards that allow it to work natively with PS3, PS4, 360, Xbox One or PC. Just plug in the USB cables and you’re good to go. When the picture was taken, I had an Xbox 360 in there (with a digital jukebox full of Xbox Live Arcade games). Currently my PS4 occupies the space for Street Fighter V purposes. Again, like I pointed out before… once you have the shell, there’s no limit to what interface you put inside it. As long as you can send control inputs to your buttons, signal to your monitor (typically Component/VGA/DVI) and sound to your speakers, anything will work. Getting a Vewlix cab of any kind is a pricey affair, since they have to be shipped overseas and potentially trucked somewhere. I got mine as part of a group buy, where 10 of us all pitched in to split the costs of shipping and customs, enabling us to get our cabs for close to the actual price (I’m into my Chewlix for about $1200 versus over $4000 if you order a single Taito Vewlix from Japan).
A third option is to get an MDF-style build from the US and assemble it yourself. I’ve seen a couple different types in person that I can recommend with confidence: Kraylix Arcade, and RecRoomMasters. The Kraylix cabs are built to order and absolutely gorgeous, and include options to have them painted and/or assembled by Kray ahead of time. The RecRoomMasters kits are fantastic if you already have your own portable arcade sticks, or have a very specific idea of what kind of cab you want (cocktail, stand up, sit down, etc.). They also offer headless versions for you to mount your own HDTV. Both of these solutions involve a fair amount of elbow grease (such as picking your monitor, adding speakers for sound, considering prefab button panels vs. populating your own), but for the DIYer looking for a great weekend project that the kids will also enjoy, they’re phenomenally fun experiences.
Other stuff you can do
Some people put heavier springs in their sticks to increase resistance and snappiness. Some add LEDs and translucent buttons, then program Arduino-style boards to light up when they’re pressed. Depending on what kind of cab you get, there are well-versed people capable of helping you print laminate marquee artwork to put on your cab. You can customize damn near anything.
A new approach for the modern age
One of the things that caught my eye back when I was getting into all of this was a newly-formed company called HitBox Arcade. They realized that the joystick, while commonly-accepted as the primary arcade interface, was outdated and subject to imprecision and error due to the analog input format. Therefore they engineered a new approach from scratch that created a stickless design, using push buttons for the cardinal directions. Right, down and left are executed with your left hand fingers, and up (typically jump in fighting games) is positioned in the low center, akin to a spacebar. To accomplish diagonals, you merely press a combination of the two desired buttons (up and right together, for example). This has been a boon for touch-typists, keyboard gaming warriors and musicians looking to get into arcade play but lacking the years of analog stick muscle memory. The up button at the bottom is a brain bender at first, but many friends of mine only casually interested in arcade games have adapted quickly to the layout and prefer it to joysticks. This has also been embraced by high level players in all communities, from fighting games to even the world’s best Tetris players as a viable alternative that offers clean execution inputs. I liked the concept so much, I cleaned up HitBox Arcade’s somewhat messy and arbitrary layout by re-engineering a Vewlix-standard version with precise measurements and have open-sourced it to custom arcade panel manufacturers. Here is a picture of my Hori VLX with a custom epoxy-painted metal panel using my revised HitBox design, manufactured by Jasen’s Customs. This isn’t the kind of approach that would be easily included in an official or premade barcade/arcade setup, but if you’re the kind of person taking a drill to MDF in order to make your own, this is definitely an option available to you.
I scrolled to the end because you write longer posts than Jeff. For chrissakes, just give me a tl;dr.
The bottom line is that setting these up to play your ROMs is only the beginning. You can spend a considerable amount of time customizing your actual gameplay experience to your performance and aesthetic liking, and there are multitudes of different (and reasonably-priced!) ways to do that. The sky is the limit here, and it’s a very fun place to fly.
4 Likes
Raspbian config changes I found essential:
-
those saucy brits behind the Pi set the default keyboard to UK layout. Change it to


 via
via dpkg-reconfigure keyboard-configuration -
you will want a larger font for a 1080p display, change it via
dpkg-reconfigure console-setup. I recommend TerminusBold at the setting just under the largest available size.
RetroPie config changes I found essential:
-
disable “quick system select” via the select menu so ← → don’t move you away from the game select page.
-
turn off that incredibly annoying “flipper” menu sound via the select menu. Sound OFF here just means sound in the emulation station UI itself, not in games. Note that holding the stick up or down for a while will move very rapidly between letters, which exacerbates the flipper sound problem.
-
disable “launch menu” for games in the retropie run command config page which can accidentally get activated by eager button mashers.
-
turn off overscan override via
disable_overscan=1in theconfig.txtfile – this let the Pi naturally scale perfectly edge-to-edge on my modern HDMI LCD -
Remove unusued emulators. Zork and ScummVM are bundled out of the box .. really? really? press f4 and use
mcto visit theretropie/romsfolder, then delete any files in these folders. They’ll stop showing up.
Controls
It’s worthwhile to understand the default shortcuts in the shared retroarch / libretro emulation layer. Starting with these basic buttons (an exhaustive list of system controllers and mappings is at the bottom of this page)
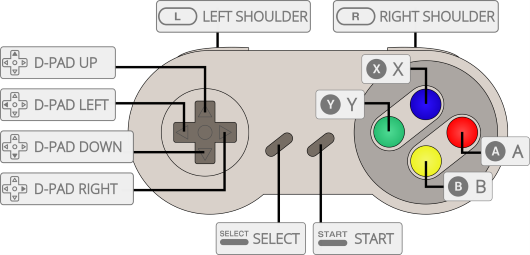
You can use these common controller shortcuts in any emulator based on libretro which is almost all of them!
select+start — exit
select+x — retroarch GUI menu
select+b — reset game
select+r shoulder — save state
select+l shoulder — load state
select+→ — state slot inc
select+← — state slot dec
Additionally in emulation station, it isn’t obvious, but:
- Jump directly to any game list index letter (a,b,c etc) via the select menu.
- Hold up or down a while to begin scrolling the game list extremely fast
- Use r shoulder and l shoulder to skip up and down a page in the game list
RetroArch / Libretro keyboard shortcuts
Any emulator that uses libretro will also work with the following RetroArch keyboard shortcuts, if you have a keyboard attached:
f8 take screenshot
o movie record toggle
p pause
h reset game
m next shader
n prev shader
e slow motion (hold down)
1 Like
great post although i didn’t go through all of it. In comments you can find valuable tips, i have build my own a few months ago: https://www.reddit.com/r/RetroPie/comments/4ko627/my_first_bartop_arcade_working_good_many_software/
but with your tips will be even better.
1 Like
A short note on ROMs, I found this post to be exceptionally helpful:
http://dsync.blogspot.com/2015/05/sourcing-and-downloading-best-possible.html
for MAME, pay very close attention to versions of romsets, as each Pi-compatible emulator expects a certain specific version of the MAME romsets.
The Atari 2600 is oddly left out of these sets, but can be found here.

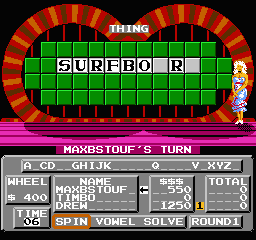
ROM management can be a problem, since the complete romsets are super large for popular systems. In an ideal world I’d have “top 100” popular ROMs for each system and ignore the hundreds (thousands?) of mediocre or bad games released that, let’s face it, nobody in their right mind wants to play in anno domini 2016. Wheel of Fortune on NES, anyone??
No-Intro ROMsets
Assuming you are working with the no-intro romsets which have a standardized naming scheme:
- delete all non-US ROMs (sorry, other countries! )
- delete all prototypes / betas / alphas
- delete all earlier revisions, when multiple revisions of a ROM are stored in the set
Some of this is captured here:
del "*(Japan)*"
del "*(Europe)*"
del "*(Korea)*"
del "*(China)*"
del "*(Brazil)*"
del "*(Australia)*"
del "*(Italy)*"
del "*(Sweden)*"
del "*(Germany)*"
del "*(Canada)*"
del "*(Asia)*"
del "*(Japan, Europe)*"
del "*(Japan, Korea)*"
del "*(Beta)*"
del "*(Beta 1)*"
del "*(Alpha)*"
del "*(Demo)*"
del "*(Proto)*"
del "*(Sample)*"
del "*(Beta 2)*"
del "*(Alt 1)*"
del "*(Program)*"
del "*(Compilation)*"
del "*(GEOS)*"
del "*(Addon)*"
(also, the x-in-1 carts, diagnostic carts, promotional carts, arcade collections that are emulated elsewhere, etc)
MAME ROMsets
For MAME, specifically, there are so many ROMs (5,000+) that a different strategy is needed. I found some good tips here.
Before you begin, make sure you are working with a split ROM set, that is, each game’s zip file contains all the ROMs necessary for that game to work. If you have a merged set, then deleting any individual game file is risky as games can potentially depend on each other for shared ROMs.
- remove all Neo-Geo games (since that has a dedicated emulator in RetroPie, anyway)
- remove all clones
- remove all bootlegs
- remove all playchoice (nes) / megaplay (genesis)
- remove all gambling games
(some other ideas: remove gambling / casino / mahjong, lightgun, etc)
I recommend dumping complete info on all games from mame.exe like so:
mame -listxml >listxml.txt
Then you can use some simple regular expressions on this listinfo.txt file to grab the matches. List all of match 1 to get the names, add .zip at the end of each line, and you’re good ![]()
All clone MAME games (2824)
<game name="([^"]+)"[^>]+?cloneof
All Neo-Geo MAME games (150)
<game name="([^"]+)"[^>]+?romof="neogeo"
All PlayChoice and MegaPlay games (61)
<game name="([^"]+)"[^>]+?romof="(playch10|megaplay)"
for the matches at this point on to work, first do a global
listinfo.txtregex replace of</game>with}so you have a reliable, unique “end of game” character to work with. Yeah, I had to cheat. Sorry!
All bootleg games (328)
<game name="([^"]+)"[^}]*?<manufacturer>bootleg
All gambling games (214)
<game name="([^"]+)"[^}]*?(mahjong|poker|casino)
All lightgun games (117)
<game name="([^"]+)"[^}]*?control="lightgun"
All prototype/beta games (94)
<game name="([^"]+)"[^}]*?(prototype|beta)
All games with disk images (86)
<game name="([^"]+)"[^}]*?<disk
All quiz and trivia games (112)
<game name="([^"]+)"[^}]*?(quiz|trivia)
Other stuff you may want to remove by keyword: beatmania, vs. NES. Removing hard drive games mostly covers this, but it’s also probably advisable to delete any ROM over 40mb in size as they are likely to be early 1996-1999 3D games that are hard to emulate.
(Mature / adult is hard to screen for using metadata alone. I found one list here.)
Neo-Geo ROMsets
The MAME style 8.3 DOS naming makes this tough. I wish there was a a way to get all Neo-Geo ROMs with proper long filenames. Here are some tips:
-
sort by filesize, remove all the tiny files under 1MB in size; these are clearly minor modifications of existing ROMsets or prototypes.
-
look for files ending in
*b.zipor*bl.zipand clean these up as bootleg versions of other ROMs. -
sort by filename and look at near-identical 8.3 filenames. Compare to filesize; if the name is the same and the filesize is smaller, it’s probably a modification or hack and can be removed.
Scraping game info
Once you have your romsets the way you want, follow the excellent instructions for scraping metadata: pictures, descriptions, etc. This will require an internet connection, but your RetroPie works fine with DHCP so just plug in an ethernet cable and have at it.
Spinner / Paddle / Wheel support
It’s pretty easy to get a spinner going on any arcade device!
-
grab a TurboTwist 2 spinner which fits directly in any standard 1 1/8" button hole. Very easy installation.
-
it presents as a mouse that only moves along one axis, which is conceptually simple and well supported.
-
it is another USB connection coming out of your existing USB controller, which isn’t a big deal. You could use an internal hub inside the controller to combine the two, if you want to get fancy.
With that in mind, here’s the only way I could get spinner working in RetroPie:
-
use AdvanceMame. Doesn’t seem to work in the other MAME variants.
-
edit
/opt/retropie/configs/mame-advancemame/advmame-1.4.rcto specify where mouse input is coming fromdevice_mouse raw device_raw_mousedev[0] /dev/input/mouse0 device_raw_mousedev[1] /dev/input/mouse1 device_raw_mousedev[2] /dev/input/mouse2 device_raw_mousedev[3] /dev/input/mouse3 -
add default control mappings for dial (assumes motion is on X axis)
input_map[p1_dialx] mouse[0,x] mouse[1,x] mouse[2,x] mouse[3,x] -
turn up the USB pollling rate for better precision. Edit
/boot/cmdline.txtand append this to the end, with a space in front:usbhid.mousepoll=2
While in game, you will almost certainly need to press esc to bring up the MAME menu and edit the analog settings to turn down the sensitivity a lot. I got really good results in Tempest and Arkanoid this way!
Trackball Support
TBD, very similar except you are using a two axis mouse
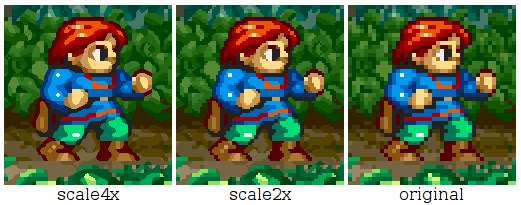
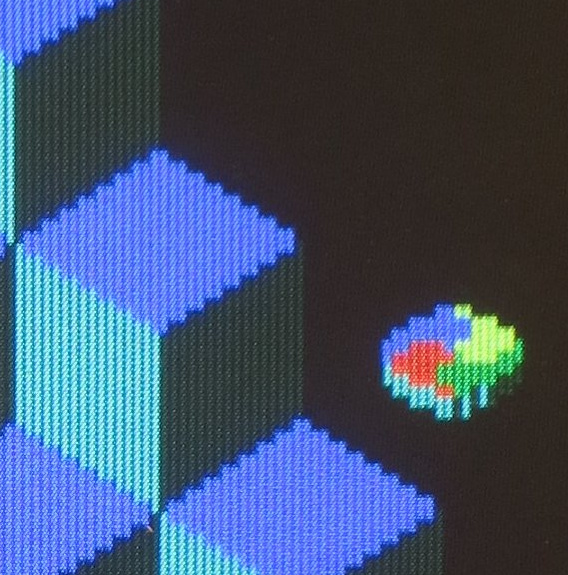
Older games are very low resolution relative to the 1920x1080 flat panel LCD you are likely using.
That’s not as bad as it sounds, because on an arcade machine or home gaming system, you’d be historically using a CRT which tends to naturally fuzz out those low resolution details:
And leads directly to this joke:

I recommend using the scale2x or hqx type scalers, which are available in all retro engines, to infer additional detail from the tiny number of pixels in play on older games.
It’s true that older games were played on monitors that had one of these effects:
Visible phosphor masks (1988+)
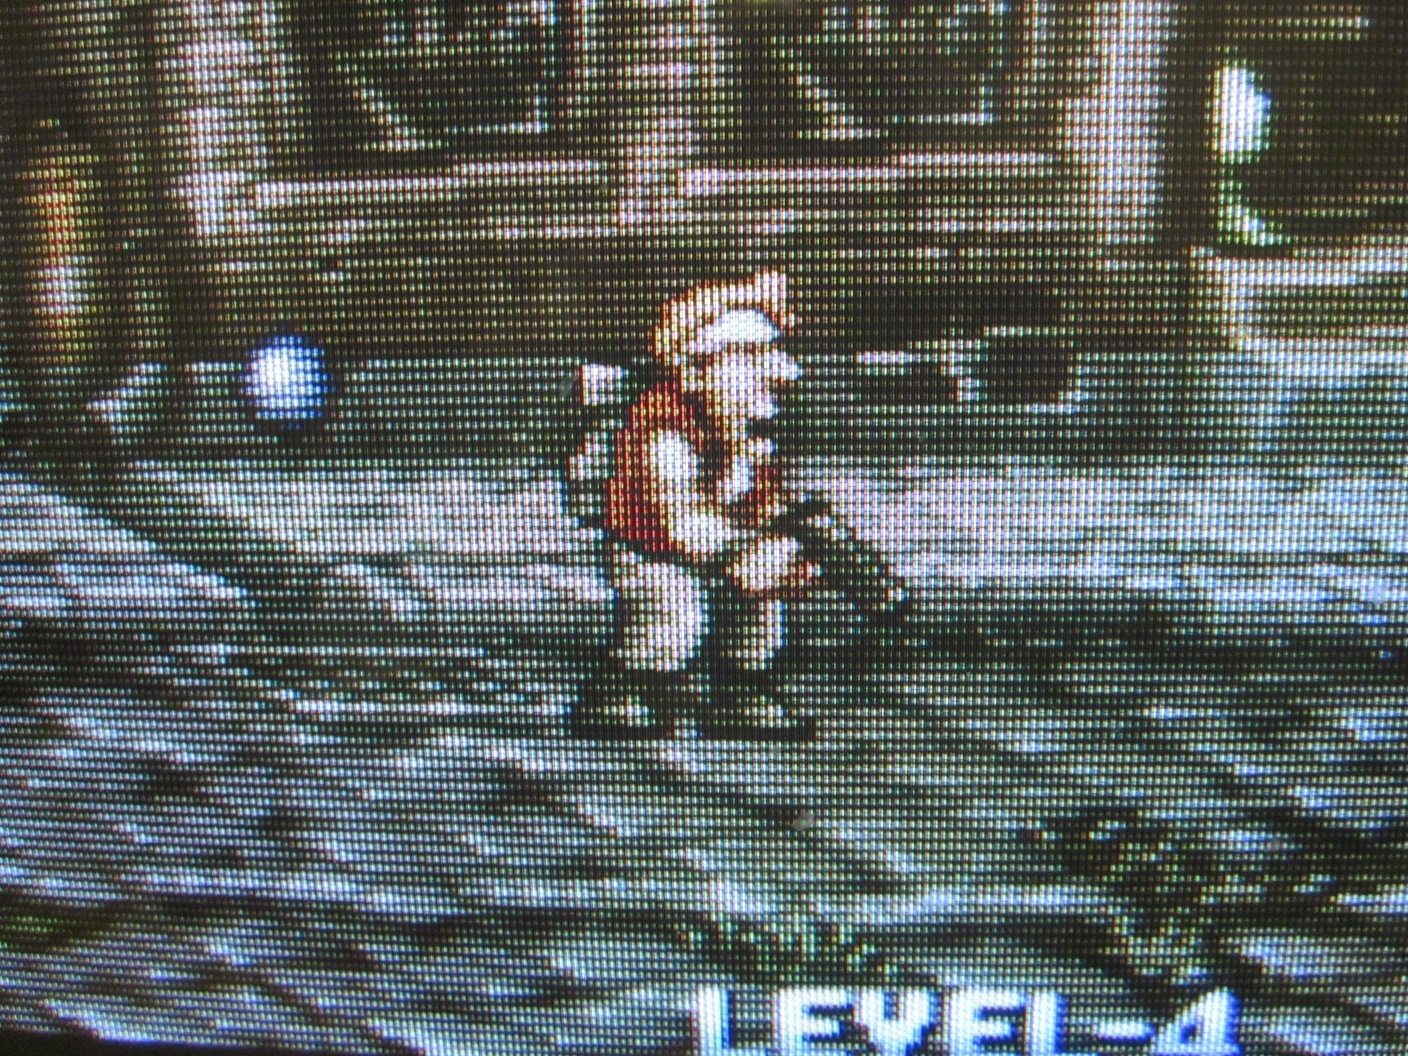
Visible scanlines (1977 - 1988)
I recommend enabling those as well, as appropriate for the age of the system or game. (Do note that scanlines should be vertical in arcade games where the monitor was rotated vertically, and horizontal when the monitor was in standard wide or portrait orientation.)