Raspberry Pi Zero e-Ink picture frame project

This will be a work in progress.

I want a digital picture frame using a fairly large monochrome e-Ink display, and there’s… not a lot out there. Given my progress on a related project, I’m gonna take this on as a to-do.

My goal is for a low-effort frame that automagically updates with nice black and white art (think Ansel Adams) every 6 hours or so?

:heart_eyes:

Here’s the parts list so far

I need to work out power. The beauty of e-Ink is that it takes zero power when it’s not being refreshed, so it just needs to …

  • wake up every so often
  • randomly pick from a large library of stored images on the SD card
  • refresh the display
  • go into a very deep sleep low power mode

Once it’s up and running, I don’t need any kind of wireless access, no active power draw for wifi or bluetooth! (I still like to have it available just in case … but will likely be disabled in daily use as a picture frame.)

I will need a battery to keep it running, and to periodically charge it… I’m thinking something like once every 6 months, ideally? Not sure what’s possible yet until I get deeper into the project… maybe any generic power bank with a micro-USB output should work? :thinking:

3 Likes

Power consumption wise, this page says

Zero HDMI off, LED off 80 mA (0.4 W)
Zero HDMI off, LED off, USB WiFi 120 mA (0.7 W)

With elaboration on his blog:

Power Notes
Disable HDMI 25mA If you’re running a headless Raspberry Pi, there’s no need to power the display circuitry, and you can save a little power by running /usr/bin/tvservice -o (-p to re-enable). Add the line to /etc/rc.local to disable HDMI on boot.
Disable LEDs 5mA per LED If you don’t care to waste 5+ mA for each LED on your Raspberry Pi, you can disable the ACT LED on the Pi Zero.
Minimize accessories 50+ mA Every active device you plug into the Raspberry Pi will consume some energy; even a mouse or a simple keyboard will eat up 50-100 mA! If you don’t need it, don’t plug it in.
Be discerning with software 100+ mA If you’re running five or six daemons on your Raspberry Pi, those daemons can waste energy as they cause the processor (or other subsystems) to wake and use extra power frequently. Unless you absolutely need something running, don’t install it. Also consider using more power-efficient applications that don’t require a large stack of software (e.g. LAMP/LEMP or LEMR) to run.

For the Raspberry Pi Zero, I used all the above techniques, and here were the results:

  1. Raspbian Jessie Lite nothing besides microSD card, and ACT LED on: 100 mA @ idle
  2. Same as #1, but disable ACT LED and disable HDMI: 80 mA @ idle
  3. Same as #1, but plug in a display, keyboard, trackpad, and WiFi adapter: 310 mA @ idle(!!)

As you can see, it pays to conserve—if you don’t need it, cut it away to save power! With the Pi Zero and these power saving techniques, you can extract a lot of usage even in low-power scenarios, like solar energy or running off a battery.

I do have some basic USB power consumption measurement passthrough dongles here so I can measure it.

There’s a nice calculator here, even!!

With a really small 1200 mAh power module, I used the following values:

  • Model Zero (remember, I’ll be disabling wifi and bluetooth after development is done)
  • 1200 mAH battery pack
  • 100 mAH idle
  • sleep modes “disabled” (not sure what this means)

I get 9.6 hours.

1 Like

Ah, but it looks like there is no super deep sleep mode, so I may need to add hardware for that:

There is no “deep sleep” mode. You can shut it down, and leave the power connected, so that grounding a specific GPIO will restart it, but IIRC the power draw is still high for battery use. The other option is to use external hardware to shut off the power, and then reaplly it when needed. There are commercial solutions (pHATs) for this.

It’s probably worth noting (for the benefit of the OP) that if you shut down a Pi, whether or not you go so far as to disconnect the power, when it is reactivated, it will have to reboot the OS. It’s very much NOT like a system with the OS resident in RAM “waking up”.

So maybe I need the Sleepy Pi 2! Details here:

Battery Hungry

The Raspberry Pi is a fantastically powerful, small and cute computer. Ideal for portable, battery powered applications. But it’s not designed for battery power! For example, the Raspberry Pi Model 3B does not have a direct battery input and consumes around 500mA of current during normal operation. Put another way, if you provide it with a regulator to use batteries, typical AA battery packs will only give you a couple of hours use (see the Raspberry Pi Battery Life Calculator).

The Raspberry Pi has NO LOW POWER MODE!

Many applications do not need the Pi to be powered at all times and could benefit from emulating the typical low power strategies common in modern microcontroller systems.

How It Works

Do you know how most modern devices save power? They switch to a low power “sleep” mode whenever they’re not being used and wake only when they next need to do something. The Sleepy Pi replicates this type of behaviour on the RPi. It allows the RPi to shut itself down when it’s not being used to save power and wakes it up when it’s got work to do (get back to work!) either at timed intervals or when some real-world signal cries out for attention.

For example, you’ve got a long term Timelapse project in mind. You want to snap a picture every 10 minutes and store it. It takes about 10 secs to snap and store. What does the RPi do with the other 9mins and 50 seconds??? Run your batteries down or waste some more mains electricity?

1 Like

You did not ask for, but a real alternative is an ESP 8266. You can run Micropython on it and it supports deep sleep. A lot of people use it for conference room displays - a good starting point is this GitHub - caedm/wall-ink: ESP8266 based e-ink conference room scheduler display. Repurposable through PHP-based server plugins to display any image. Outlook, Exchange, Booked, Google Calendar API and iCal server scheduler support.
HTH

2 Likes

Oh that does look promising!

The original design parameters of this project were to display a room schedule electronically with no wires, at the cheapest possible price point. No Ethernet, no power wires, in a low-cost footprint. The resulting project has produced a AA powered WiFi E-ink device for under $100 (US), when parts are purchased in bulk, where the batteries last a year or two.

Thank you for pointing it out! One thing I worry about is the resolution, it looks like the device can’t support higher resolution e-ink displays.

2 Likes

You might found the main challenge here. I haven’t seen it working for displays larger than 7". But I think it’s solveable. I think I have a 9", too. I’ll get back asap.

2 Likes

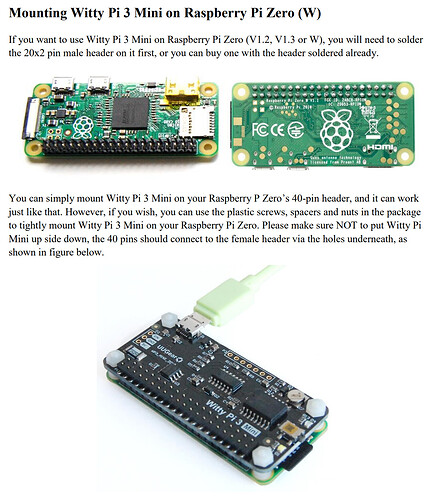
This looks workable to me, after reading the PDF docs:

It’s kind of a hack, in that you are installing a different, second, much lower power system to turn the Pi on and (safely) off at regular intervals. But… hey, who doesn’t love a nasty hack now and then? :rofl:

2 Likes

It’s just a Waveshare 7,5" with e-Paper HAT for Pi.

1 Like

The Witty looks good. Let’s do the math now. It consumes 1mA during Stand-by. Let’s assume you need to run the Pi for 10 mins to change the picture, and you do this three times a day. It consumes 100mA while running. This setup consumes 50mAh a day plus 24mhA for the Witty = 74mAh per day in total. Ignoring self-discharge, you’ll get 13,5 days per Ah. Thus, for six months, you need ~ 14 Ah. Not very small, but this might be ok.

I have a 6" Inkplate here - it’s ESP32 based - not Pi, but worth a look. They’re crowdsourcing for a 10" here

2 Likes

Yes and the docs say you want an “always on” external battery pack:

What is dummy load?

The dummy load is a functionality that can be activated when your Pi is off. You may need this functionality when you power your Witty Pi + Raspberry Pi with power bank. When your Pi is off, the current draw by Witty Pi is very small, while most of the power banks will enter sleep mode when the load is not big enough, as a result your Witty Pi may not get powered when the scheduled startup is due.

When the dummy load is activated, Witty Pi will draw rather high pulsed current from the power bank with a fixed interval; this may fool the power bank and avoid entering the sleep mode. The dummy load is implemented on firmware level, that it gives power to your Pi for short moment with a fixed interval. Not all USB current meter can capture that pulsed current, because it only lasts very short moment.

Please notice that, dummy load is just a trick that tries to fool the power bank - not all power banks can be fooled. Some of them calculate and check the integral of current, and dummy load cannot keep them awake with pulsed current.

Choose a power bank with “always on” mode may also be an approach. The “always on” mode will prevent power bank from entering sleep mode. For example, Voltaic’s V15, V25, V50, V75 and V88 support the “always on” mode. If you are going to buy a new power bank to power your Witty Pi + Raspberry Pi, they could be considered.

The Voltaic V50 is 12800 mAh for $70 on Amazon, and has the required “always on” feature.

Let me see if my math agrees with yours…

  • 1 mA per hour during standby = 24 mAh
  • 100 mA while running for 10 minutes means 100 mA / 6 = 16.7 mA
  • 16.7 mA three times a day is 50 mAh

24 + 50 = 74 mAh

Let’s call it 100 mAh per day just to be extra safe? (and note other sites have measured 80 mAh average idle power consumption of the Pi Zero, but we have to go through the intensive bootup and shutdown sequence each time, so I like your number better.)

So 12800 mAh / 100 = 128 days or 4.3 months?

The key really is having a super low power sleep mode. Heck even a mode that reduced power consumption from 80 mAh to something like 10 mAh would be huge – that would give 42 days of runtime on the 12800 mAh battery. I’m truly surprised there isn’t anything like this built into the Pi.

2 Likes

@codinghorror, have you thought of using a different board for this project? ESP32 has everything you might need - I2C\SPI for the screen, WLAN, and deep sleep support.

As how you can do it with RPI: You can use a pi pico for timed switch functionality or one of these hats.

Maybe you can try to underclock pi0, disable all interfaces, etc to get as much battery life as possible, but I am not sure if you’d be able to get more than a week out of 12800mAh with pi0w.

1 Like

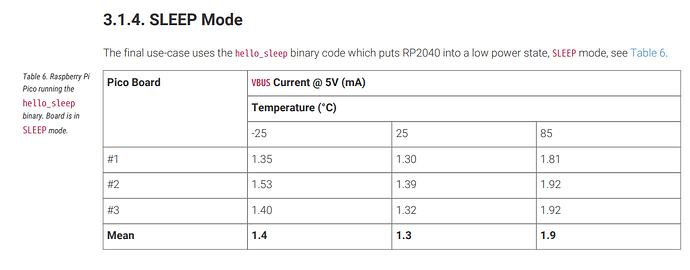
Yes the Pi Pico looks more appropriate… it has a real sleep mode that, by my reading, is under 2 mA?

1 Like

Most likely jpeg but SD cards are so big these days I could store them in some larger, raw format like BMP if needed? Good point on less energy required, though decompression tends to be fast, no compression at all is perfectly workable!

1 Like

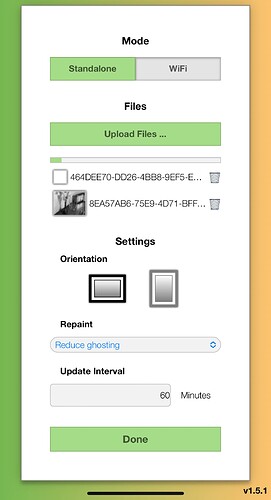
I kinda gave up on this due to time constraints and went with the commerical one at https://framelabs.eu/ … it is very well made and has a simple interface. You actually connect to it via local wifi and it has a little web interface for adding pictures and everything!

Hold down the button at the bottom for 4 seconds (pressing it will cycle the images manually if you don’t hold), then connect via http://192.168.1.1:

I am filling the frame with 50 images (the max it supports) from Ansel Adams.

https://commons.wikimedia.org/wiki/Category:2011_Ansel_Adams_donation_from_U.S._National_Archives

Its resolution is 13.3", 1600 × 1200, 16 shades of grey with dithering. If you don’t want to be limited by the built in storage, you can also set up a remote image host and it’ll pull down unlimited images over wifi but it takes some setup per the manual.

1 Like

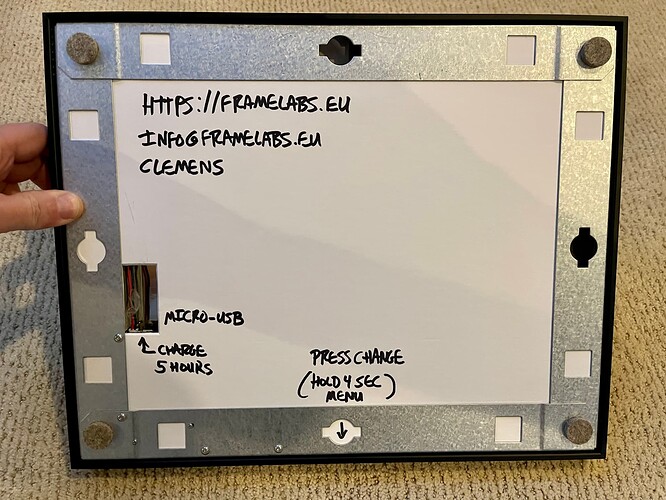
I wrote all the notes from the letter included on the back with a black sharpie so I don’t forget. This is also a pretty decent “quick start guide”!

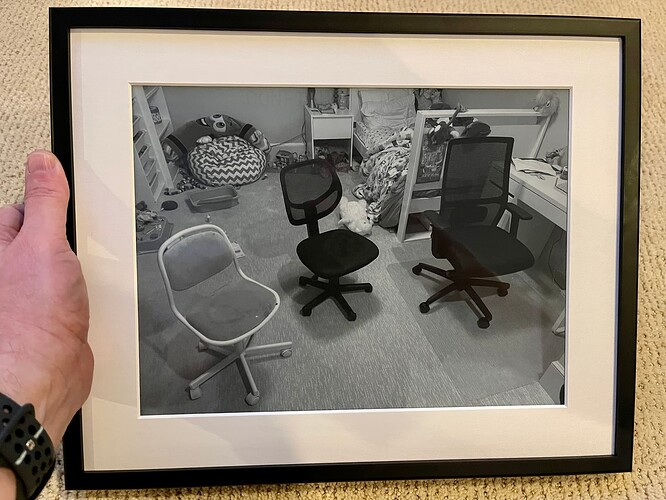
And to show the frame displaying a custom picture, here’s a silly test pic I took of three generations of chair upgrades at our house…

Also, despite what the docs say, there is a charging LED and it turns off when the device is fully charged. I like these so much I’m going to get a few more…

2 Likes

Actual pic of it in action with Ansel Adams art at the correct resolution (downsized to 1600 px wide)

The web UI for importing is quite nice, it auto crops to center when the image dimensions aren’t quite right.

2 Likes

I bought two more of these, they’re so incredibly well made. I wanted another 13.3" for portrait vs. landscape, and a smaller 9.7" one. Loving them so much! :heart_eyes:

I wish more companies made eInk frames… my only regret is that the amount of storage is too limited for what you’re paying, especially on the larger ones.

2 Likes

There’s an important firmware update, you want 1.5.4 or better (mine shipped with 1.5.3) due to some corruption bugs when the web server is under heavy load – like your browser is downloading all the thumbnails at once.

I uploaded a new firmware 1.5.4-beta to https://github.com/framelabs-eu/firmware
How to update the firmware: https://framelabs.eu/firmware-update

And an important tip:

:loudspeaker: If you want the device to show the images ‘as-is’, you need to upload the exact resolution as a 4-bit grayscale png. Otherwise the image will be converted to 4-bit grayscale and resized during upload. You can use pinch and pan gestures to adjust the dashed cut-out rectangle.

I had been resizing the images to the correct size, roughly, but the file format matters as well.

2 Likes

I finally updated the firmware on my 3 frames to 1.5.5 beta. Not too bad, only tweak is that I had to check Device Manager as it showed up as COM3 not COM1 as the docs said it might.

PS C:\Users\jatwo> esptool.py --port COM3 --baud 2000000 write_flash 0x10000 C:\Users\jatwo\Downloads\artframe\ArtFrame-Firmware-1.5.5-beta.bin
esptool.py v4.1
Serial port COM3
Connecting......
Detecting chip type... Unsupported detection protocol, switching and trying again...
Connecting.....
Detecting chip type... ESP32
Chip is ESP32-D0WD (revision 1)
Features: WiFi, BT, Dual Core, 240MHz, VRef calibration in efuse, Coding Scheme None
Crystal is 40MHz
MAC: e8:db:84:03:9c:48
Uploading stub...
Running stub...
Stub running...
Changing baud rate to 2000000
Changed.
Configuring flash size...
Flash will be erased from 0x00010000 to 0x00132fff...
Compressed 1188304 bytes to 709062...
Wrote 1188304 bytes (709062 compressed) at 0x00010000 in 11.0 seconds (effective 867.5 kbit/s)...
Hash of data verified.

Leaving...
Hard resetting via RTS pin...
1 Like